
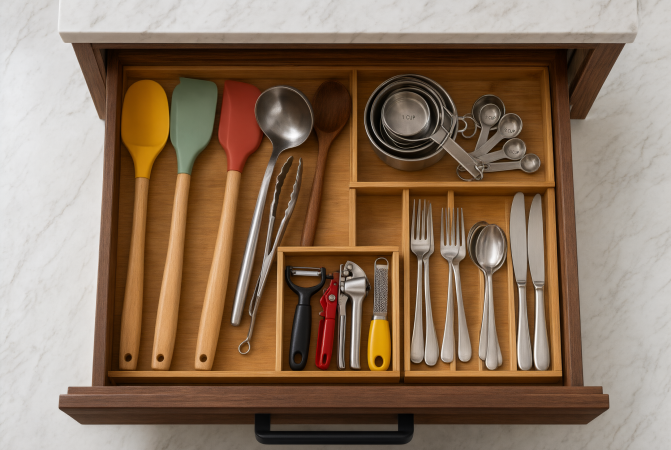
Here’s what actually works when you want to figure out how to organize kitchen drawers: pull everything out, toss what you don’t need, group the rest by how you use it, and give every drawer a single clear job. After that, drop in dividers or organizers sized to the drawer’s actual inside measurements. Put your daily-use items up front and in the drawers nearest to where you cook, and tuck the occasional-use stuff toward the back or in lower drawers.
Kitchen drawers turn into a mess for one straightforward reason — they’re enclosed spaces where you drop things instead of placing them carefully. Give it a few months and you’ve got duplicates stacking up, long tools tangled together, tiny gadgets buried under bigger ones, and you’re fishing around for the one spatula you actually want. A solid drawer system solves this by matching each type of item to its own defined spot.
This guide walks you through the entire process from start to finish — decluttering, picking the right organizers, and setting up specific solutions for small drawers, deep drawers, utensil drawers, and those big drawers meant for large tools. You’ll also find three example layouts you can adapt to your own kitchen, plus a simple maintenance plan to keep everything in order.
Step 1: Empty and Declutter Every Drawer
Do this before you spend a single dollar on organizers. Organizers only sort what you already own, so if your drawer is packed with stuff you never touch, a divider just gives the clutter a neater address.
Work one drawer at a time, or tackle the whole kitchen if you’ve got a free afternoon. Lay everything out on a counter or table where you can actually see it all at once.
Now wipe out the drawer. Get rid of crumbs and grime, then clean it with warm water and a bit of dish soap or your favorite all-purpose cleaner. Let it dry completely before anything goes back inside.
Sort everything into three piles: keep, relocate, and discard or donate.
Hunt down the duplicates. Most kitchens genuinely need two or three spatulas — not seven. Hold onto the ones you actually reach for.
Toss what’s broken or unsafe. That means cracked plastic utensils, spatulas with melted edges, bent measuring spoons, and any gadget that’s dull or damaged and you’ve never once used.
Move items that don’t belong in a drawer. Tools you barely touch — a turkey baster, specialty cookie cutters, a mandoline — can live in a cabinet, the pantry, or a higher shelf instead of fighting for prime drawer real estate.
Here’s a useful test: if you can’t remember the last time you used something and you can’t point to a specific upcoming reason you’ll need it, it probably doesn’t deserve a front-row spot in your drawer.
Step 2: Group Items Into Practical Categories
With the drawers cleared out, sort everything by what it does rather than how it looks or how big it is. The categories most kitchens end up with:
- Everyday cutlery — forks, spoons, table knives
- Cooking utensils — spatulas, ladles, tongs, whisks, slotted spoons
- Measuring tools — cups, spoons
- Small gadgets — peelers, can openers, garlic press, zesters
- Knives and cutting accessories
- Baking tools — rolling pin, pastry brush, piping tips
- Food storage accessories — bag clips, lids, wraps, foil
- Dish towels and general kitchen accessories
Your categories should match how you actually cook. A household that bakes every weekend might want baking tools in their own dedicated drawer. Someone who bakes once a year can fold those items into a general tools drawer. Not every kitchen needs a separate drawer for every single category, and forcing that structure usually leaves you with half-empty drawers next to overflowing ones.
| Drawer category | Typical items | Suggested organization |
|---|---|---|
| Cutlery | Forks, spoons, table knives | Divided cutlery tray |
| Cooking tools | Spatulas, ladles, tongs, whisks | Long, adjustable compartments |
| Measuring tools | Cups and spoons | Small divided section or shallow bin |
| Small gadgets | Peelers, openers, zesters | Compact organizer or small bins |
| Baking accessories | Pastry brushes, cutters, piping tools | Grouped bin or dedicated section |
| Food storage accessories | Bag clips, wraps, foil | Separate compartment or shallow bin |
Step 3: Assign a Purpose to Every Drawer
Now that your categories are set, figure out where each one goes. The guiding principle here is simple — store items close to where you first use them:
Everyday cutlery works best near the dishwasher or the dining area, so unloading and setting the table both stay quick.
Cooking utensils belong near the stove or your main prep surface, where you can grab them with one hand while the other one stirs or holds a pan.
Measuring tools and baking items are happiest near your mixing or prep space.
Frequently used items go in the drawers you can open without bending down — usually the top or middle drawers.
Occasional-use items can live in lower drawers or farther from the main work triangle.
This is really the core idea behind kitchen work zones — grouping storage around tasks like prep, cooking, cleaning, and serving. You don’t have to redesign your kitchen to put this to work. Just notice where you stand when you do each task, and keep the right tools within arm’s reach.
If you’re figuring out how to organize kitchen cabinets and drawers together, apply the same thinking across both. Cabinets near the stove can hold pots and pans. Cabinets near the dishwasher can store plates and glasses. Drawers hold the smaller, frequently grabbed tools that don’t sit well on shelves.
Example: A Four-Drawer Setup
Here’s one arrangement that works well. Think of it as a starting point, not a rule:
- Top drawer near the stove: everyday cooking utensils — spatulas, spoons, tongs, whisks
- Second drawer: measuring tools, small gadgets, and items you reach for during prep
- Third drawer near the dishwasher: cutlery in a divided tray
- Bottom drawer: baking tools, bag clips, and less frequently used items
Adjust this to fit your kitchen. If your only drawer near the stove is shallow, put flat utensils there and move the bulky ones to a deeper drawer somewhere else.
How to Organize Small Kitchen Drawers
Small drawers demand more thought because every inch counts. You’re trying to make limited space more functional without cramming it so full that nothing fits right.
Measure first. Grab a tape measure and find the usable interior width, depth, and height of the drawer — not the outside of the cabinet front. Take note of anything that eats into the space, like drawer slides, a raised lip, or a curved front.
Choose slim or adjustable trays. Expandable trays adjust to your drawer’s width, which helps when standard sizes don’t quite fit. Trays that leave big gaps around the edges waste space and let items slide around.
Use vertical space where it works. If the drawer has some height, small bins or narrow compartments can hold upright items like measuring spoons nested together. Just make sure the drawer still closes fully with everything in place.
Combine similar small tools. Group peelers, openers, and small gadgets in one compartment instead of giving each its own space.
Don’t force oversized items in. A whisk with a large balloon head or a long ladle probably belongs in a deeper drawer or a countertop crock.
Cut the extras. Remove packaging, attachments you never use, and duplicate accessories. Small drawers fill up fast with items that look useful but never come out.
For a very small drawer, a good rule is to store only what you reach for every week. Everything else can move somewhere else. That approach to how to organize small kitchen drawers beats hunting for a clever organizer that holds more stuff you don’t need.
How to Organize Deep Kitchen Drawers
Deep drawers hold a ton — which is exactly why they turn into chaos. Without some structure, items pile on top of each other and whatever you need is always buried at the bottom.
Create sections with adjustable dividers. Dividers let you split a deep drawer into lanes sized to your tools. Set them so items fit snugly without being crammed.
Separate everyday from occasional items. Keep daily tools toward the front where you see them first. Put the occasional-use stuff toward the back or in a lower layer.
Use bins when they help access. A bin for small accessories keeps them from migrating through the drawer. But containers eat usable space, so only choose them when they genuinely improve how you reach things.
Place heavy items thoughtfully. Put heavier tools at the bottom or near the front where they’re easy to lift without reaching over other items. Don’t assume a drawer can hold unlimited weight — check the manufacturer’s information for the drawer’s load rating when storing anything heavy.
Avoid deep stacking. If you have to move three items to reach one, the stack is too deep. Use dividers or a second-layer organizer so the top layer stays organized and the lower layer holds true backup items.
Use inserts that match the drawer. Inserts and trays designed for your drawer’s dimensions use the depth better than loose containers that shift around.
The whole point of organizing a deep drawer is to use the full depth without creating storage you can’t actually access. If you can’t see or reach something easily, it isn’t really being used.
How to Organize Deep Kitchen Drawers for Utensils
A deep drawer is one of the best spots for utensils because long tools can lie flat or stand upright without getting bent or crowded. The trick is giving each utensil type its own space.
Consider organizing by type:
- Spatulas and turners together in one lane
- Ladles and large spoons in another, since their bowls take more room
- Tongs in their own section, since they spring open and snag on other tools
- Whisks in a separate compartment, because the wire heads tangle easily
- Serving spoons and slotted spoons grouped with large cooking spoons or in a lane of their own
Horizontal vs. vertical storage. Horizontal storage in long compartments works well when the drawer is wide and moderately deep. Vertical storage, where tools stand in a divided section or container, can work in very deep drawers — but only if the tool handles clear the top and the drawer still opens and closes smoothly.
Prevent overlap. Some overlap is fine, but if utensils stack three or four high, the items on the bottom become hard to get. Add another divider or move duplicates out.
Check clearance. Long tools should fit comfortably without pressing against the back of the cabinet or interfering with the drawer’s movement. Test by opening and closing the drawer a few times with the full load.
How to Organize Big Kitchen Drawers and Large Tools
Big drawers can hold bulky items that don’t fit in standard utensil trays — large serving utensils, mixing tools, food processor attachments, and some pot and pan accessories.
- Adjustable dividers create custom compartments for odd-shaped tools.
- Modular bins group smaller accessories, like food processor blades or attachment pieces, so they don’t scatter. Store sharp blades with care, in a covered or enclosed container.
- Peg-style systems use movable pegs to hold items in place. They suit larger items like lids or plates in deep drawers and can be reconfigured as your needs change.
Be realistic about what belongs in a drawer at all. Heavy appliances and bulky equipment depend on the drawer’s rated capacity, the item’s dimensions and weight, and the manufacturer’s guidance. Don’t assume a drawer can handle something just because it physically fits. When in doubt, check the drawer’s specifications or choose a sturdier storage location like a lower cabinet or a shelf.
Knife Storage
Sharp knives need protection. If you keep knives in a drawer, use an in-drawer knife tray or a dedicated knife organizer that holds each blade securely, or slip each knife into an individual blade guard. Never leave loose blades among other utensils where you could cut yourself reaching in. A knife block or a wall-mounted magnetic strip are safer alternatives if drawer space is tight or if children are in the home.
Choose the Right Kitchen Drawer Organizer
Organizers range from dead simple to fully modular. The right choice depends on your drawer size and what you’re putting inside.
| Organizer type | Best use | Main benefit | Potential limitation |
|---|---|---|---|
| Expandable tray | Cutlery and small utensils | Adjustable width | May not fit every drawer perfectly |
| Adjustable dividers | Large utensils | Custom compartments | Needs accurate positioning |
| Bamboo organizer | Cutlery and tools | Multiple sections, natural look | Must match drawer dimensions |
| Plastic cutlery tray | Everyday cutlery | Easy to clean, affordable | Fixed layout |
| Modular bins | Small accessories | Flexible arrangement | Can consume usable space |
| Deep drawer insert | Deep drawers | Uses depth well | Needs a compatible drawer |
| Peg system | Larger kitchen items | Reconfigurable storage | Requires a compatible drawer |
What to Check Before You Buy
- Interior width, depth, and height. Measure inside the drawer, not the outside of the cabinet. Interior measurements are what determine fit.
- Clearance. Make sure the drawer still closes fully with the organizer and its contents inside.
- Drawer construction. Some drawers have slides, rails, or sloped sides that reduce usable space.
- Material. Bamboo, plastic, and metal each have different cleaning and durability traits. Check care instructions from the maker.
- Ease of cleaning. Removable trays are easier to wash than fixed ones.
- Compatibility. Some drawer systems are designed to work with specific inserts. Verify before purchasing.
A good habit is to sketch the drawer on paper with your measurements, then arrange your categories on the sketch before buying anything.
IKEA Kitchen Drawer Organization Ideas
Lots of people search for how to organize kitchen drawers IKEA-style because IKEA kitchens often use standardized cabinet systems and offer inserts made to fit them. The principles are the same as for any drawer, with one important addition: don’t assume every IKEA drawer uses the same dimensions or insert system.
Here’s a safe approach:
- Identify your drawer system. Check your kitchen documentation, the cabinet label, or the product listing for the drawer type and dimensions.
- Measure the interior anyway. Even with a standard system, measure the inside width, depth, and height to confirm fit.
- Check compatibility on the product page. IKEA’s official product pages list which cabinet widths or drawer types an insert is designed for. Verify it against your own drawer.
- Use adjustable inserts to create sections. Matched inserts often use space more efficiently than loose containers, and they can hold cutlery, cooking utensils, and gadgets in separate zones.
- Mix and match carefully. Pair a cutlery tray with a utensil insert or a few small bins, based on what you need to store.
Product ranges, names, dimensions, and availability change over time, so confirm current details on IKEA’s official website or with a store associate before purchasing. If you can’t verify a specific insert for your drawer, general modular organizers measured to your drawer are a reliable fallback.
Creative Kitchen Drawer Layout Ideas
The best layouts aren’t about looking pretty. They put the right tool in the right place. Here are layout ideas for common drawer types:
- Everyday cutlery drawer: a divided tray with separate sections for forks, spoons, and knives, plus one extra section for serving pieces or chopsticks.
- Cooking utensil drawer: long compartments for spatulas, ladles, and tongs, with whisks and slotted spoons in their own sections.
- Baking tools drawer: a bin or section for pastry tools, a spot for measuring cups, and a shallow tray for small accessories.
- Small gadget drawer: compact bins for peelers, openers, and zesters, with the most-used items in front.
- Food storage accessory drawer: a separate compartment for bag clips, rolls of foil or wrap, and spare lids.
- Towel and miscellaneous drawer: folded towels in a stack, with a divider for oven mitts or trivets.
The right layout depends on your cooking habits, drawer sizes, and available storage. Try an arrangement for a few weeks, then adjust.
Three Example Layouts
These are illustrative examples, not universal rules. They don’t include exact dimensions because drawer sizes vary widely between kitchens.
Example 1: Small Kitchen
- Drawer 1: everyday cutlery in an expandable tray
- Drawer 2: cooking utensils (two spatulas, one ladle, tongs, one whisk), plus a small section for measuring tools
- Drawer 3: miscellaneous tools, including a peeler, can opener, scissors, and bag clips, in compact bins
With only three drawers, each one has to cover multiple categories. Keep only the tools you use weekly, and store extras in a cabinet.
Example 2: Medium Kitchen
- Drawer 1: cutlery and everyday utensils
- Drawer 2: cooking tools in long, adjustable compartments
- Drawer 3: measuring and baking tools
- Drawer 4: small gadgets in modular bins
This is the four-drawer setup shown earlier. It gives each major category its own home without overcomplicating things.
Example 3: Kitchen With Deep Drawers
- Top section of a deep drawer: long cooking utensils in horizontal compartments, easy to see and grab
- Middle section: large kitchen tools, such as a mixing spoon set or a potato masher, in dividers sized for them
- Modular containers: small accessories such as attachments or piping tips grouped in bins so they don’t roll around
- Back or lower section: occasionally used items, kept separate from daily tools
The separation between frequent and occasional items is what keeps a deep drawer from becoming a pile.
Common Kitchen Drawer Organization Mistakes
| Mistake | How to avoid it |
|---|---|
| Buying organizers before measuring | Measure the interior of each drawer first and sketch a layout |
| Keeping unnecessary utensils | Declutter first and keep only what you use |
| Mixing unrelated items | Group by function so each drawer has a clear purpose |
| Overfilling compartments | Leave a little breathing room so items are easy to grab |
| Stacking too many tools | Use dividers or a second layer rather than piling |
| Storing frequent items in hard-to-reach places | Put daily tools in the most accessible drawers |
| Ignoring height and clearance | Check that the drawer closes fully with everything inside |
| Using containers that waste space | Choose organizers sized to the drawer, not generic bins |
| Not maintaining the system | Build quick reset habits (see below) |
How to Keep Kitchen Drawers Organized
An organized drawer only stays that way if the system is easy to maintain.
Return items to their assigned spot. Every tool should have a home. If something doesn’t, decide where it goes.
Do a quick reset regularly. Once every month or two, scan each drawer, remove anything that doesn’t belong, and straighten what has shifted.
Clean organizers periodically. Remove trays, wipe them down following the maker’s care instructions, and dry before replacing.
Reassess when habits change. If you start baking more or cooking for more people, adjust your categories.
Think before adding new gadgets. Ask where it will live and what you’ll remove to make room.
Frequently Asked Questions
How do people organize their kitchen drawers? Most people group items by task — cutlery, cooking utensils, gadgets — and give each group its own drawer or section. They use dividers or trays to keep categories separate, and place frequently used items closest to where they’re needed.
What are some creative ways to organize kitchen drawers? Try adjustable dividers for long utensils, modular bins for small accessories, and peg systems for larger items. Dedicated drawers for baking tools or food storage accessories also help. The most useful ideas are practical rather than decorative.
How can I effectively organize my kitchen drawers? Empty each drawer, remove what you don’t need, sort the rest into categories, and assign each drawer a purpose. Measure the interior before buying organizers, and keep daily tools in the most accessible drawers.
What is the best way to organize kitchen utensils? Sort them by type and store them in long compartments or adjustable sections near the stove. Separate whisks, tongs, and ladles so they don’t tangle, and keep only the utensils you use regularly.
How do you organize a deep kitchen drawer? Use adjustable dividers to create lanes, keep everyday tools toward the front, and avoid stacking items too deeply. Use inserts or bins that fit the drawer, and store heavier items where they’re easy to lift.
How do you organize a small kitchen drawer? Measure the interior, then use slim or adjustable trays. Keep only frequently used items, group similar small tools together, and move oversized gadgets to another location.
What should go in a kitchen utensil drawer? Typically spatulas, ladles, tongs, whisks, and serving or slotted spoons. Keep it near the stove, and leave out items you rarely use or duplicates.
How do you organize large kitchen utensils? Use adjustable dividers or long compartments, and give each tool type its own section. Avoid overlapping and check that the drawer opens and closes freely with everything inside.
What type of drawer organizer is best? It depends on the drawer. Expandable trays suit cutlery, adjustable dividers suit large utensils, and modular bins suit small accessories. The best organizer is the one that fits your measured drawer.
How do you organize IKEA kitchen drawers? Identify your drawer system, measure the interior, and check compatibility on the official product page before buying inserts. Use adjustable or matched inserts to create sections for cutlery, utensils, and gadgets.
Conclusion
Organizing kitchen drawers comes down to a few repeatable steps: declutter, group by function, give each drawer a job, and match organizers to measured space. Small drawers need compact, carefully chosen storage. Deep drawers need structure to prevent stacking. Large drawers need a realistic view of what should be stored there in the first place.
Start with one drawer this week — ideally the one you open most. Empty it, sort it, measure it, and rebuild it with a clear purpose. Once you see how much easier it is to cook and clean, the rest of the kitchen follows.