
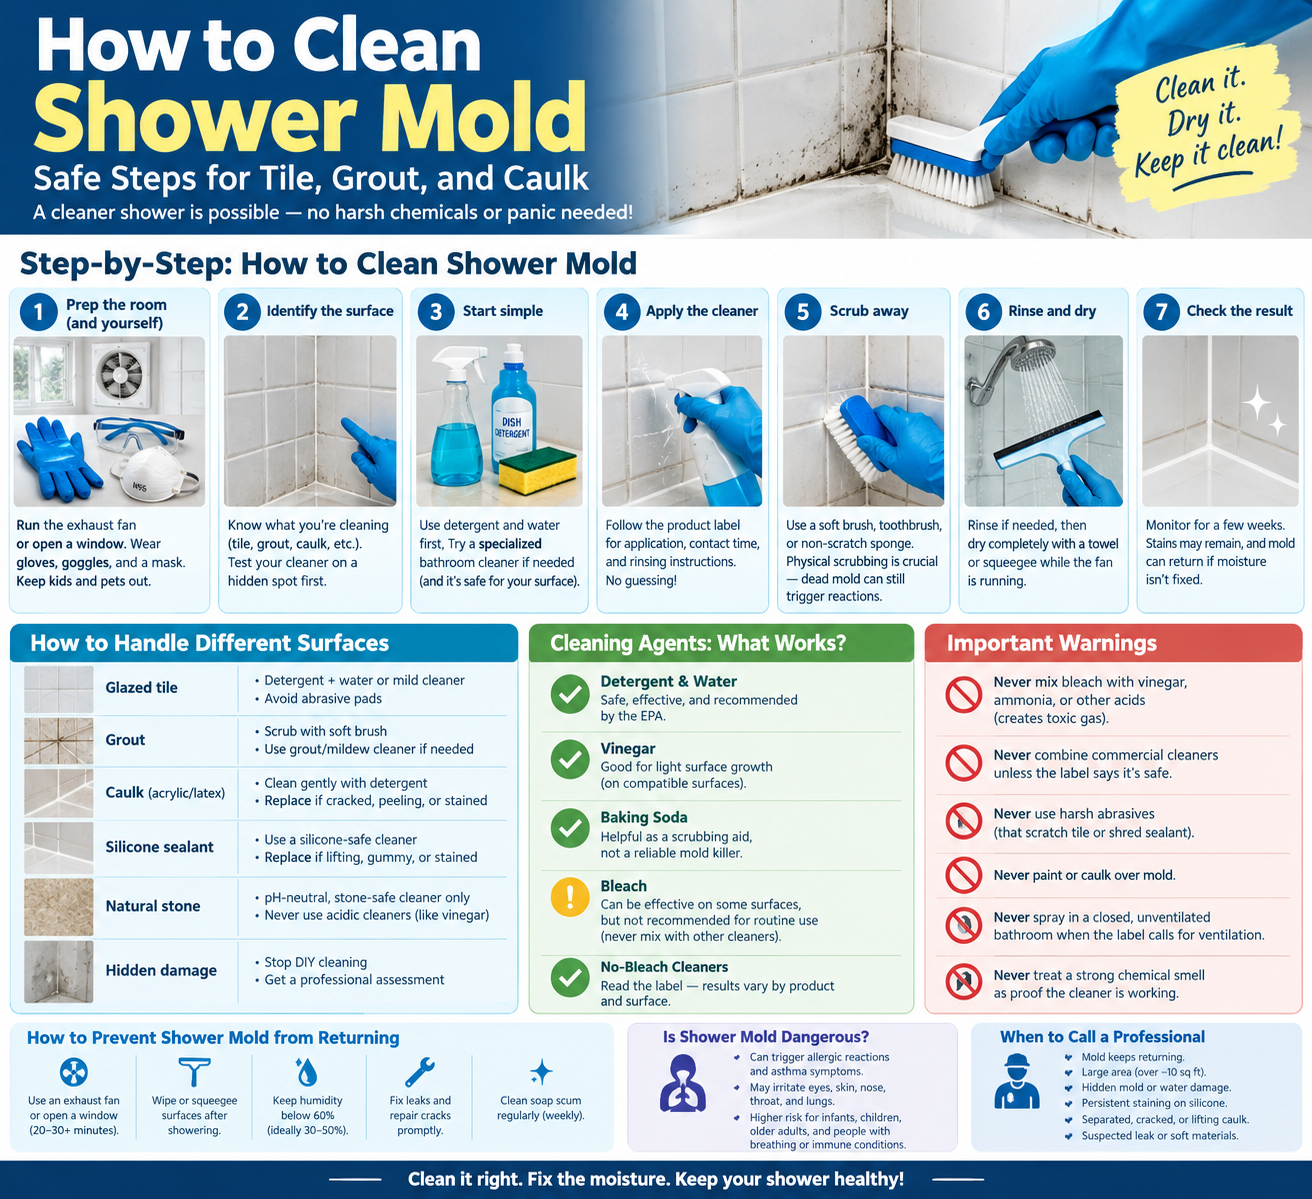
Dealing with shower mold is a rite of passage for homeowners, but you don’t need harsh chemicals or panic to get rid of it. The most effective way to clean shower mold is straightforward: ventilate the room, protect yourself with gloves and eye gear, scrub the affected hard surface with detergent and water (or a surface-safe cleaner), rinse thoroughly, and dry it completely.
According to the EPA, scrubbing mold off hard surfaces and drying them is the foundational rule of cleanup. However, the mold will inevitably return unless you address the root cause: excess moisture.
Your approach should change depending on the surface. Glazed tile can handle a firm scrub, while natural stone requires gentle, pH-neutral care. Meanwhile, caulk or silicone that is cracked, lifting, or stained beneath the surface often needs replacing, not just cleaning. This guide breaks down exactly how to handle each scenario, compares popular cleaning agents like bleach and vinegar, and clarifies when a shower problem has outgrown a DIY fix.
Why Mold Grows in a Shower
Mold has one non-negotiable requirement: moisture. The EPA notes that mold spores are everywhere, but they only begin to grow when they land on wet surfaces. A shower provides the perfect storm. It stays damp for hours, and soap scum mixed with body oils gives mold a ready-made food source.
You’ll usually spot growth first in the areas that stay wet the longest: corners, caulk lines, the bottom tracks of shower doors, and grout near the tub ledge. Because moisture is the main culprit, the EPA’s top bathroom advice focuses on prevention. If mold keeps reappearing, boosting ventilation (via an exhaust fan or open window) and wiping down surfaces more frequently will usually keep it at bay.
Identify What the Mold Is Growing On
Before grabbing a cleaner, figure out which surface you’re dealing with. A product that works wonders on glazed tile might permanently etch natural stone or degrade your caulk.
| Surface | Suitable Approach | Important Precaution | When to Repair or Get Assessed |
|---|---|---|---|
| Glazed ceramic or porcelain tile | Detergent and water with a soft brush or non-scratch sponge; a labeled bathroom cleaner if needed. | Avoid abrasive pads that can dull the glaze over time. | Rarely needed, unless water is actively getting behind the tile. |
| Grout | Detergent and water with a soft or grout brush; a labeled grout/mildew cleaner if needed. | Grout is porous. Stains may remain after the mold is dead. Check labels before using acids on cement-based grout. | Crumbling, cracked, or missing grout lets water behind the tile and needs repair. |
| Caulk (acrylic or latex) | Gentle cleaning with detergent and water, then dry thoroughly. | Do not scrape or dig at it more than necessary. | Replace if it is cracked, peeling, or stained all the way through. |
| Silicone sealant | Gentle cleaning with a soft cloth/brush and a cleaner approved for silicone. | Do not paint or caulk over existing mold. | Replace if the bead is lifting, gummy, or stained underneath. |
| Natural stone (marble, travertine, limestone) | Stone-safe, pH-neutral cleaner only. Follow the manufacturer’s label. | Never use acidic cleaners (like vinegar), as they will etch the stone. | N/A |
| Suspected hidden damage (soft walls, loose tile, musty smell with no visible source) | Stop DIY surface cleaning immediately. Find the moisture source. | Do not tear into walls without knowing what you might disturb (e.g., asbestos, extensive rot). | Get a professional assessment right away. |
How to Clean Shower Mold Step by Step
- Prep the room (and yourself). Run the exhaust fan and crack a window. If you’re using a disinfectant, the EPA advises exhausting that air directly outdoors. Wear goggles (without ventilation holes) and long gloves. Ordinary rubber household gloves work fine for soap and water, but if you’re using strong cleaners, upgrade to nitrile, neoprene, or PVC. An N-95 respirator can reduce spore inhalation, but ensure it fits properly (and check with a doctor first if you have breathing issues). Keep kids and pets out.
- Identify the surface. Refer to the table above. When in doubt, test your cleaner on a small, hidden spot first.
- Start simple. For hard surfaces, detergent and water is the EPA’s recommended starting point. Only move to a specialized bathroom mold cleaner if the soap doesn’t do the trick and the product is safe for your surface.
- Apply the cleaner as directed. Follow the commercial product’s label for application method, contact time, and rinsing instructions. There is no universal “soak time,” so don’t guess.
- Scrub away the visible growth. Use a soft brush, an old toothbrush, or a non-scratch sponge. Physical scrubbing is crucial because the EPA notes that dead mold can still trigger allergic reactions. It must be physically removed, not just chemically killed. Avoid wire brushes or harsh scrapers that scratch tile or shred caulk.
- Rinse and dry. Rinse if the product directions require it, then dry the area completely with a towel or squeegee while the fan is still running. Do not leave the surface wet.
- Check the result. Monitor the area over the next few weeks. The EPA points out that mold can leave permanent stains, and restoring the original appearance isn’t always possible. If dark marks remain on caulk, check if it’s lifting. If growth returns quickly, you likely have a hidden leak or poor ventilation.
Rule of thumb: Never cover visible mold with fresh caulk or paint. The EPA explicitly states to clean and dry surfaces first.
How to Clean Black Mold in a Shower
Let’s address the elephant in the room: black mold. You clean it the exact same way you would clean any other shower mold: scrub it off compatible hard surfaces, rinse, dry, and fix the moisture issue.
Color does not tell you which mold species you have. The EPA notes that molds come in many colors, and both white and black molds exist. When visible mold is present, sampling to identify the specific species is generally unnecessary.
A small patch of dark growth on tile, grout, or the surface of caulk is normally a straightforward DIY job. The EPA’s general rule of thumb is that about 10 square feet (roughly a 3×3 ft patch) is the limit for handling cleanup yourself. Treat this as a screening guide, not an absolute safety guarantee. DIY cleaning becomes the wrong tool when the growth is extensive, keeps returning, sits behind loose tile, or is accompanied by water damage. Avoid alarmist language about “toxic” mold; the practical response to dark mold is the same as for any mold.
How to Remove Mold from Shower Caulk and Silicone
Mold on caulk and silicone is the most common homeowner complaint, and it forces a simple decision: clean it or replace it. GE’s sealant guidance offers a useful test: clean the sealant if it is still firmly bonded and the discoloration wipes off the surface. Replace it if an edge is lifting or the staining sits under the bead.
How to remove mold from shower caulking naturally
- Inspect first. Look for cracks, gaps, lifting edges, or a gummy feel. If you see any of these, skip straight to replacement.
- Start gentle. Scrub the surface with detergent and water using a soft brush or toothbrush.
- Consider a mild household option. Vinegar can be tried on compatible surfaces, but check what is next to the caulk first (see the vinegar section below). Do not expect any home remedy to bring heavily stained caulk back to its original bright white.
- Rinse and dry thoroughly. Moisture left sitting in the joint is an open invitation for regrowth.
- Judge the result. Surface growth should wipe away. If dark staining remains after a good scrub, the discoloration is likely embedded in the material itself.
Persistent black discoloration doesn’t automatically mean living mold is still there. Stains can linger in sealant long after the growth is gone, and no amount of cleaning will repair degraded sealant.
How to get black mold out of shower silicone
Silicone is smooth and non-porous, so mold growing only on its surface usually wipes right off. However, mold that has worked its way underneath or inside a separated bead is a different story, because you simply can’t reach it by scrubbing the top.
If the mold won’t come off, keeps returning quickly, or the bead has pulled away from the tile or tub, you must remove the old sealant and reseal. Keep these points in mind:
- Do not apply new silicone over moldy or wet sealant. GE notes that new silicone will not bond properly over dirt, leftover sealant, or moisture.
- Remove the old bead completely using a sealant removal tool. Clean off all mold and residue, and let the joint dry fully before applying new sealant. GE’s instructions also recommend a final wipe with isopropyl alcohol before resealing.
- Follow the sealant manufacturer’s directions for surface prep and cure time before using the shower again.
- If the joint was wet or moldy because of a leak, find and fix the leak first.
How to Clean Shower Mold with Vinegar
Vinegar is a popular home option for light surface growth on compatible hard surfaces, but it is acidic. Results vary wildly depending on the surface, the amount of growth, and the type of vinegar. There is no authoritative source for a universal vinegar concentration or soak time. If you use it, treat it as a cleaning aid and rely on physical scrubbing, rinsing, and drying to do the heavy lifting.
A cautious way to use it on glazed tile:
- Test a hidden spot first.
- Apply it to the moldy area, scrub with a soft brush, and wipe away the loosened growth.
- Rinse with plain water and dry the surface immediately.
Where vinegar can cause trouble:
- Natural stone: Mapei, a leading tile and grout manufacturer, warns that vinegar is acidic and can permanently etch stone such as marble, travertine, and limestone.
- Grout: Some cleaning-product manufacturers warn that repeated acid exposure can weaken cement-based grout over time. Use it sparingly.
- Sealant and unknown materials: If you aren’t sure how a surface will react, check the manufacturer’s care instructions first.
Vinegar does not kill every type of mold, nor does it guarantee full removal. Never mix it with bleach or any bleach-containing product, as this mixture releases deadly chlorine gas. The Missouri Poison Center also warns against mixing vinegar with hydrogen peroxide.
Best Shower Mold Cleaner Without Bleach
You do not need bleach to clean shower mold. In fact, the EPA does not recommend it as a routine cleaning step. To choose a good no-bleach option:
- Start with detergent and water. It’s the EPA’s baseline and is safe for most hard surfaces.
- Read the label for the surface. A bathroom mold or mildew cleaner should explicitly state that it is safe for your specific tile, grout, natural stone, or sealant.
- Follow the directions exactly. This includes contact time, ventilation requirements, glove use, and whether to rinse.
- Know what the claim means. “Removing visible mold,” “killing microorganisms,” and “removing discoloration” are three entirely different results. A product might do one without doing the others.
Keep in mind that “no bleach” does not mean harmless or suitable for every surface. Some no-bleach products are acidic, abrasive, or peroxide-based and carry their own restrictions. There is no single verified “best” product for every shower, so always check current labels before you buy.
What is the Best Homemade Mold Remover?
No single homemade remedy works best everywhere. You have to match the option to the surface and the specific job.
| Option | Typical Role | Limitations | Key Safety or Compatibility Point |
|---|---|---|---|
| Detergent and water | First choice for scrubbing mold off hard surfaces (EPA’s basic method). | Needs physical scrubbing; may not remove deep stains. | Safe on most hard surfaces; always rinse and dry. |
| Vinegar | Light surface growth and soap film on compatible tile. | Not a universal mold remover; can harm natural stone and weaken some grout. | Never mix with bleach; test on a hidden spot first. |
| Baking soda | Mild scrubbing aid for residue on suitable surfaces. | Not shown to reliably eliminate mold of any type on its own. | Can scratch soft or polished finishes if rubbed too hard. |
| Bleach-based cleaner | Disinfecting or whitening on suitable non-porous surfaces. | Does not fix moisture or hidden growth; can discolor some materials. | Never mix with other cleaners; ventilate well; follow label. |
| Commercial no-bleach cleaner | Labeled mildew or mold removal. | Results vary heavily by product and surface type. | Follow label strictly for surface compatibility, contact time, and rinsing. |
Can baking soda remove mould?
Baking soda can help as a gentle abrasive when you are scrubbing mold or residue off a compatible surface. However, it is not an established, reliable way to eliminate mold on its own. Treat it as a scrubbing aid, not as a magical remedy that kills the growth. (This applies equally to the British spelling, “mould”.)
Does toothpaste remove mold?
Short answer: no. Toothpaste is not an established or effective method for cleaning mold. Some pastes are actually abrasive enough to scratch tile glaze or shred sealant. Stick to detergent and water or a product specifically labeled for the surface.
Bleach vs. Vinegar: Which cleans shower mold better?
Neither is universally better. The more useful question is which one suits your specific surface, and the EPA is clear that physical removal matters most.
- Bleach-based cleaner: Best for hard, non-porous surfaces where the label allows it. It still requires scrubbing (dead mold can still cause allergic reactions) and can discolor some materials. It requires strict ventilation and should never be mixed with other cleaners.
- Vinegar: Best for compatible glazed tile and some other hard surfaces. Effects vary and are not guaranteed. Acid can harm natural stone and may wear on grout with repeated use. Never mix with bleach or hydrogen peroxide.
The EPA states that using a biocide like chlorine bleach is not recommended as a routine part of mold cleanup, though professional judgment may call for it in specific cases (e.g., when immune-compromised individuals are present). If you choose bleach, the CDC advises using no more than 1 cup of bleach per gallon of water, opening windows and doors, and never mixing it with ammonia or any other cleaning product. Your product’s label always comes first.
Crucial warning: If you have already applied one product, do not add a second on top. Rinse the surface well with water and let it clear completely before switching cleaners.
Is Mold in a Shower Dangerous?
For most healthy people, a small patch of mold in the shower is primarily a cleaning and moisture problem, but it can affect some individuals more than others. The EPA states that mold can cause allergic reactions, trigger asthma attacks in people with asthma who are allergic to mold, and irritate the eyes, skin, nose, throat, and lungs even in non-allergic people.
The CDC lists infants and children, older adults, people with asthma, allergies, or other breathing conditions, and people with weakened immune systems as groups who may be at greater risk.
Is black mold in a shower dangerous?
Color alone does not answer that. A black patch is not proof of a particular “toxic” species, and the same cleanup protocol applies to any visible mold.
Is it safe to shower in a shower that has mold?
For most people, showering with a small amount of surface mold is not an emergency, but you should clean it soon and reduce exposure. There is no EPA or federal limit for mold in a home, so no specific number makes a shower officially “safe” or “unsafe.” People with asthma, allergies, or weakened immune systems should be more cautious and talk to a doctor if they have health concerns. You should hold off on using the shower entirely if you see extensive growth, a persistent musty smell, damaged or soft materials, or an active leak.
What Should You Never Spray on Shower Mold?
- Never mix bleach with vinegar, ammonia, or other acids. Bleach mixed with an acid releases deadly chlorine gas, and bleach mixed with ammonia produces toxic chloramine fumes. If you smell a sharp chemical odor after mixing, leave the room immediately, get fresh air, and call the Poison Help line at 1-800-222-1222.
- Never combine commercial cleaners unless every manufacturer explicitly states it is safe.
- Never use a product on a surface its label excludes. This includes using acids on natural stone.
- Never spray in a closed, unventilated bathroom when the label calls for ventilation.
- Never use harsh abrasives that scratch tile or shred sealant.
- Never paint or caulk over mold.
- Never treat a strong chemical smell as proof a cleaner is working. A strong odor means you need more ventilation, not that the mold is dying faster.
- Never spray chemicals at growth inside damaged walls when a professional assessment is warranted.
How to Prevent Shower Mold from Returning
Cleaning without fixing the moisture issue just leaves the root cause in place. The EPA recommends keeping indoor humidity below 60 percent, ideally between 30 and 50 percent. While no routine can guarantee mold never returns, these steps drastically cut down on the damp conditions it needs to thrive:
- Run an exhaust fan that vents outdoors during your shower and for at least 20–30 minutes afterward, or open a window.
- Wipe or squeegee walls, glass, and doors after showering, and dry corners and ledges.
- Leave the shower curtain or door open afterward so air can circulate and dry the space.
- Clean soap scum regularly. GE notes that soap and residue can cause secondary mold growth even on cured sealant. A quick weekly scrub of corners and caulk lines is a highly effective habit.
- Repair leaks, failed sealant, and cracked grout promptly.
- Watch for dampness that does not dry or discoloration that returns.
- Renters should report leaks and moisture problems to the building owner or manager right away in writing.
When Should You Call a Mold Removal Professional?
Call a professional when the problem is bigger or deeper than surface cleaning can safely reach.
| Situation | What to Do |
|---|---|
| Minor surface growth on tile, grout, or firm sealant | Routine DIY cleaning. |
| Mold that keeps returning after cleaning | Look for a moisture source (leak, poor ventilation); repair it before cleaning again. |
| Persistent staining on silicone | Replace the sealant if it will not come clean. |
| Separated, cracked, or lifting caulk | Remove and reseal after the joint is completely dry. |
| Suspected leak or soft, damaged materials | Have the moisture source assessed and repaired by a pro. |
| Large (over ~10 sq ft), concealed, or water-damaged growth | Hire an experienced mold remediation professional. |
Professional work usually begins with finding the moisture source, then identifying affected materials, containing the work area when appropriate, removing materials that cannot be cleaned, cleaning suitable surfaces, drying the area, and correcting the underlying problem. The exact process depends on the extent and location of the growth. The EPA suggests that a hired contractor should have specific experience with mold, provide references, and follow EPA’s remediation guidance or other professional guidelines. It also advises calling in a professional if sewage or contaminated water caused the damage, or if you suspect hidden mold. For porous materials and larger problems, refer to our broader mold removal guide.
Frequently Asked Questions
What cleans mold out of a shower?
Detergent and water with a soft brush cleans most hard shower surfaces effectively. A cleaner specifically labeled for bathroom mold can help if it is compatible with your surface. Always dry the area completely afterward.
What 100% kills mold?
Nothing is proven to kill every mold under all conditions, and “killing” isn’t actually the primary goal. The EPA states it is neither possible nor desirable to sterilize an area; a background level of spores will always remain. These spores will not grow once moisture is controlled. Your goal is to remove the visible growth and keep the shower dry.
What naturally kills black mold?
No natural or household ingredient is guaranteed to eliminate black mold or growth inside damaged materials. Vinegar or baking soda may assist with surface cleaning on compatible surfaces, but physical scrubbing and thorough drying do the main work.
What is the best homemade mold remover?
Detergent and water is the most dependable, safest homemade choice for hard surfaces. Refer to the comparison table above for the specific roles and limitations of vinegar, baking soda, and other options.
Final Takeaway
To clean shower mold safely, scrub the visible growth off with detergent and water or a surface-appropriate cleaner, rinse, and dry it completely. Replace any sealant that stays stained or has pulled away. Then, fix the root cause with better ventilation, faster drying habits, and prompt leak repairs. Never mix bleach with vinegar or other cleaners, and don’t hesitate to call a professional if the mold is large, hidden, or keeps coming back.
1 thought on “How to Clean Shower Mold: Safe Steps for Tile, Grout, and Caulk”