
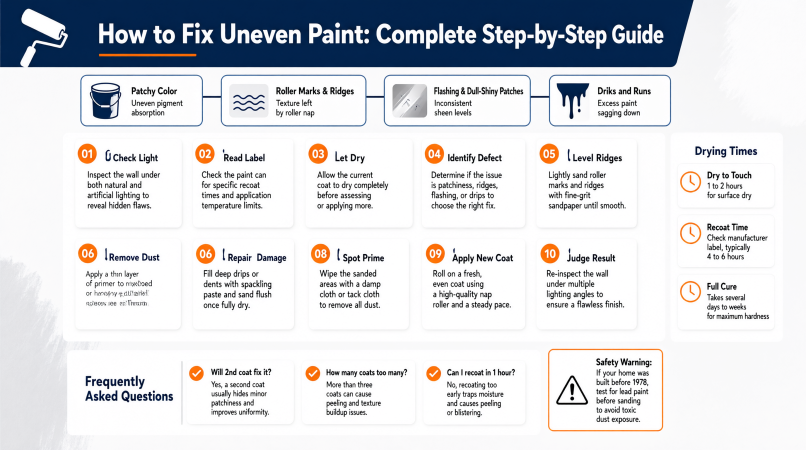
The Short Answer (Before We Get Into the Details)
Look, fixing uneven paint isn’t really about slapping on another coat and hoping for the best. I’ve seen too many folks do exactly that, only to end up with five coats of patchy paint and a wall that still looks terrible. The real answer depends entirely on what’s actually wrong with your paint job.
Here’s the quick version: let the paint dry completely (follow the label, not some random YouTube video), examine the wall under angled light to see what you’re actually dealing with, and then match your fix to the specific defect you’re seeing.
- Thin or patchy color? One more even coat after the proper recoat time usually does the trick.
- Raised ridges, roller lines, or dried drips? You need to sand those smooth first, wipe away the dust, then recoat.
- Dull and shiny patches (flashing) or blotches over patched areas? Spot prime the absorbent spots if needed, then repaint the entire wall from corner to corner.
- Still patchy after several coats? Stop right there. More paint won’t help. You’re probably dealing with an unprimed surface, a porous patch, uneven application technique, or possibly a product issue.
Here’s what most people miss: extra paint alone will never flatten a ridge, seal a porous patch, or fix a contaminated surface. The sections below walk you through exactly how to figure out which problem you’ve got and how to fix it properly.
What Uneven Paint Actually Looks Like (And Why It Happens)
“Uneven paint” is kind of a catch-all term that covers several different defects. Trust me on this one — naming your specific problem correctly will save you hours of frustration and probably a few gallons of paint.
| What You See | What It Actually Is | Common Cause |
|---|---|---|
| Color varies, old color shows through | Patchy or thin coverage | Too few coats, paint spread too thin, unmixed paint |
| Dull and shiny areas that show at an angle | Flashing (uneven sheen) | Porous or patched surface, uneven film thickness, over-thinned paint |
| Darker or lighter frame around edges | Picture framing or hatbanding | Brushed edges and rolled areas have different texture and film build |
| Parallel ridges or texture lines | Roller marks or lap marks | Overloaded or dry roller, reworking paint that’s starting to set |
| Streaks | Uneven distribution | Too little paint on the roller or brush |
| Drips and sags | Runs | Too much paint on the tool or in one pass |
Benjamin Moore points out something interesting here: streaks usually come from too little paint on your roller or brush, while drips and runs come from too much. And blotchy paint? That tends to show up when a wall wasn’t primed, wasn’t primed properly, or just didn’t get enough coats for a uniform finish.
The manufacturers have plenty to say about this too. Sherwin-Williams lists porous surfaces, uneven film thickness (lapping), coatings applied too thin, and moisture or temperature swings during drying as the main culprits behind uneven sheen. PPG adds over-thinning the paint, spreading it too far, and substrates so porous that the topcoat just soaks right in.
A few other things worth checking: dust or grease on the wall, paint that wasn’t stirred properly, using the wrong roller nap, or painting outside the temperature and humidity range printed on the label.
One thing that catches a lot of people off guard — paint that looks patchy while it’s still drying can actually look totally fine once it’s fully dry. So do yourself a favor and only judge the wall after the recoat period on the label has passed.
How to Fix Uneven Paint on Walls: Step by Step
Use this order for most interior walls. Skip any step your wall doesn’t need — there’s no prize for doing extra work.
Step 1: Check the wall in the right light. This is where most people mess up right from the start. Turn off your overhead lights and shine a bright flashlight or lamp across the wall at a shallow angle, or look at it in natural daylight. Roller ridges, flashing, and patched spots show up way more clearly in raking light. Mark your problem areas lightly with painter’s tape so you can find them later when you’re ready to fix them.
Step 2: Read the label. I know, I know — nobody actually reads paint labels. But find the recoat time and the temperature and humidity limits for your specific paint. The label or the product’s technical data sheet is the final authority here, not some general chart you found online.
Step 3: Let the paint dry before you judge it. Wait at least the recoat time on the label. A wall can feel dry to the touch and still not be ready for another coat, and full curing takes way longer than that (we’ll get into timing below).
Step 4: Decide which defect you’re dealing with. Compare what you see with the table above. This decision drives everything that comes next.
Step 5: Level any raised defects. For dried drips, gently scrape off the bulk with a razor blade or paint scraper. Then sand with a sanding block or sponge until you can’t feel the ridge anymore. Benjamin Moore’s recommended method uses medium sandpaper (around 100 grit) to level the defect, then fine grit (220) to remove the scratches, and finally feathers the edges so the sanded area blends smoothly into the surrounding wall. Sand only the defect and its edges. Don’t sand the whole wall unless the surface is rough everywhere.
Step 6: Repair any damage and let it dry. Fill dents, gouges, or exposed drywall with appropriate filler, let it dry as directed, and sand it flush.
Step 7: Remove all the dust. Wipe the wall with a damp sponge or cloth and let it dry completely. Dust trapped under your new coat causes a rough finish and can lead to adhesion problems down the road.
Step 8: Spot prime absorbent areas. Bare drywall, filler, and patched areas soak up paint differently than the sound paint around them. Prime those spots with a suitable primer so they absorb the topcoat evenly. If you sanded through the paint down to bare drywall, prime that spot too.
Step 9: Apply the new coat. Here are the habits that actually matter:
- Keep your roller evenly loaded. If you have to press hard to get paint onto the wall, reload.
- Work in small sections and overlap each pass slightly.
- Keep a wet edge — meaning you’re always rolling into paint that’s still wet.
- Don’t go back over paint that has started to set.
- Finish each wall in one go, corner to corner.
Step 10: Judge the result after the recoat period. Check again in angled light. If the problem is just thin color, one more even coat is often enough. If the same defect comes back, the cause isn’t coverage — go back to step 4 and figure out what’s really going on.
Whether you need steps 5 through 8 depends entirely on the defect. A purely thin first coat might only need step 9.
Will a Second Coat Fix Uneven Paint?
This is probably the most common question I get, and the honest answer is: it depends.
A second coat fixes uneven paint only when the cause is coverage. If your first coat was thin, the color was uneven, or the underlying color is showing through, a well-applied second coat after the label’s recoat time often solves the problem. Sherwin-Williams even lists an additional coat as one way to even out sheen irregularities.
But here’s where a second coat won’t help:
- Raised ridges or dried drips. Paint follows the shape underneath. The ridge will still show, so sand it first.
- Poorly repaired drywall. Patches that weren’t primed keep absorbing paint differently.
- Surface contamination. Dirt, grease, or dust stops paint from bonding and leveling properly.
- Peeling or adhesion failure. New paint over loose paint fails right along with the old paint. Scrape and sand back to a sound edge first.
Benjamin Moore goes even further for blotchy walls caused by missing primer: their advice is that extra coats won’t cure that problem at all. The wall needs to be primed and repainted. A practical rule of thumb I’ve picked up over the years — if two properly applied coats look the same as one, stop adding paint and diagnose the surface instead.
How to Fix Blotchy Paint and Uneven Sheen
Blotchy color and uneven sheen are actually two different problems, even though they often show up together.
Uneven color means the amount of pigment on the wall varies. More even coverage fixes it.
Uneven sheen (flashing) means the surface reflects light differently from place to place, even if the color is technically the same. It shows up most under light striking the wall at a low angle.
For flashing and blotches, work through these in order:
- Don’t spot touch up. A small patch of fresh paint often looks different from aged paint around it, especially in higher sheens. Touch-ups also stand out more on dark colors. One paint maker’s advice for flashing is to repaint the whole wall or section instead of trying to correct just one spot.
- Prime absorbent areas first. If the blotches follow patches, filler, or bare drywall, spot prime those areas so they stop soaking up paint.
- Repaint the whole wall. Roll the entire wall, corner to corner, with a fully loaded roller and even pressure.
- Mind the conditions. Sherwin-Williams lists moisture and temperature swings while drying as causes of flashing. Keep the room within the label’s temperature and humidity range while the paint dries.
Some pros and manufacturers suggest that a lower sheen like matte or flat hides touch-ups better than high sheens. If you’re repainting anyway and the wall gets scuffed a lot, check whether a lower sheen would suit your needs better.
Drying and Recoat Times: What You Actually Need to Wait
Three different stages get confused all the time, and each one means something different:
| Stage | What It Actually Means |
|---|---|
| Dry to touch | The surface is no longer wet or tacky. Often within an hour or two for latex paint under good conditions. |
| Recoat time | The earliest time the label allows another coat. This is the number that matters for fixing uneven paint. |
| Cure | The film reaches full hardness and durability. Commonly cited as several days to a few weeks for latex paint. |
There’s no single correct wait time that applies to every paint. Many interior latex paints list a recoat window of a few hours, but products differ, and cool, humid, or poorly ventilated rooms slow drying considerably. Always use the label for your specific product. Waiting too short a time can weaken the bond between coats and lead to blistering, cracking, or peeling later.
Can I recoat paint in one hour? Only if your product’s label says so, and the conditions on the label are actually met. Some fast-drying products list short recoat windows, but standard interior latex paints usually need longer. Don’t assume that “dry to touch” means “ready to recoat.”
Can I paint two coats in one day? Yes, if the label’s recoat time fits inside your day and the room is warm, dry, and ventilated enough. If the air is cool or humid, the same paint can need noticeably longer.
How quickly can I do a second coat? At the recoat time stated on the label for your temperature and humidity, and not sooner.
Is two days enough for paint to dry? Two days is usually enough for the paint to be recoated and for you to judge the finish. It’s usually not enough for the paint to fully cure, so avoid scrubbing, taping, or placing heavy items against the wall for longer than that.
Is 24 hours the rule? Not really. Some guidance suggests waiting 24 hours before making adjustments, but that’s not a universal requirement. It’s a reasonable, cautious waiting period if the label isn’t available and the paint was applied thickly or in cool, humid conditions, but your label comes first.
Is it okay to cut in one day and paint the next? It can be done, but it increases the chance of visible differences. Brushed edges and rolled areas have different texture and film thickness, and once the cut-in edge has dried, rolling next to it can leave a frame-like band of different sheen or color (picture framing or hatbanding). To reduce the risk, cut in and roll each wall in the same session, or at least cut in only as much as you can roll before the edge dries. Some DIY painters report that rolling lightly over the brushed edge with a dry-ish roller reduces visible banding. Treat that as a technique to test in a small area first, and check your paint’s label.
How Many Coats of Paint Is Too Many?
Three coats aren’t too many by default. The number you need depends on the paint, the color change, the existing surface, and whether the wall was primed. Dark-to-light changes, bare or patched drywall, and porous surfaces often need primer plus two finish coats, and some deep colors need more. What matters is whether each coat is making visible progress.
Why is my paint still patchy after four coats? If four coats still look patchy, more paint isn’t the answer. Check these causes in order:
- Porous or unprimed areas. Patches and bare drywall keep absorbing paint. Prime them.
- Application issues. Roller pressure, loading, lapping into semi-dry paint, and thin coats all leave patchy results.
- Product problems. Low-hiding paint, a mismatched primer, unmixed paint, or a different batch of paint can cause visible variation.
- Conditions. Cold, damp, or poorly ventilated rooms can change how the film forms and dries.
- Lighting. Raking light exaggerates tiny variations that disappear in normal light. Check from the normal viewing position as well.
Fix the cause first, then do a final even coat.
How to Fix an Uneven Spray Paint Job
Spray defects behave differently from roller defects, so they need their own repair methods. This applies whether you’re using spray cans on furniture or trim, or an airless sprayer on walls.
Common spray problems:
- Runs and sags: Too much paint in one pass or the sprayer held too close.
- Orange peel: A bumpy, orange-skin texture from thick coats or poor technique — holding the sprayer too far or too close, or using the wrong pressure.
- Dry spray: A rough, dusty finish from spraying from too far away or in hot, windy conditions.
- Fisheyes: Small craters from dirt, oil, or moisture on the surface.
- Blobs: Lumps from old paint or a clogged nozzle.
How to fix them:
If the paint is still wet, you can gently brush out a fresh run with a clean brush, but this only works if you act quickly.
If the paint is dry, level runs and orange peel with fine sandpaper (and on small projects, wet sanding works great), then clean off the dust.
Recoat in light coats, keeping the can or sprayer moving. Follow the label for the time between coats.
Don’t bury defects under extra paint. More coats on top of a run or heavy buildup just make the problem worse and can trap solvent.
Recoat windows on spray products can be unusual, so read the can carefully. As one example, a retailer listing of a Rust-Oleum oil-based spray primer shows a recoat window of within 1 hour or after 48 hours at 70°F and 50 percent humidity, and says to wait 4 hours before dry sanding. Inside that gap, recoating can cause wrinkling or poor adhesion. Your product may be different, so always check its own label.
Spray in a well-ventilated area, keep solvent-based products away from heat and flames, and follow the label for respirator and ventilation requirements.
Uneven Paint on Ceilings and Exterior Surfaces
Ceilings
Ceilings show defects because light often strikes them at a shallow angle from windows. A few habits help a ton:
- Use actual ceiling paint. Benjamin Moore describes its ultra-flat ceiling paint as designed to hide common ceiling imperfections.
- Cut in the edges first, then roll in manageable sections while the edge is still wet.
- Keep the last pass of rolling in one direction.
If roller marks show, a repair patch will often show too. For a uniform look, you may need to repaint the whole ceiling from wall to wall, not just the flawed area.
Exterior Surfaces
On exteriors, weather and surface condition matter just as much as technique.
Follow the product’s application limits for surface and air temperature, and avoid painting when rain, dew, or condensation can reach the wet film. Moisture or condensation while paint dries is one of the causes of flashing listed by Sherwin-Williams.
Chalky, dirty, or damp surfaces need to be washed and dried before repainting.
Sherwin-Williams notes that some exterior oil-based or alkyd paints can chalk, and that washing the chalk off usually restores most of the finish, though it may chalk again. Their suggested long-term fix is recoating with an acrylic and following label directions.
Separate cosmetic unevenness from real failure. Peeling, bubbling, or cracking usually points to moisture or adhesion problems, not a simple sheen or coverage issue. Scrape and sand back to sound paint, fix the moisture source, prime bare areas, and then repaint.
Four Common Scenarios and the Right Fix
These are illustrative examples based on real situations I’ve seen plenty of times.
Example 1: Patchy wall after the first coat. A freshly painted wall shows lighter patches where the roller ran dry. After the recoat time on the label, the wall is sound, clean, and free of ridges. A second even coat with a well-loaded roller, rolled corner to corner, should fix it. If the same patches show through again, the surface needs priming.
Example 2: Shiny and dull patches over drywall repairs. The wall was patched and painted without priming. The patches look dull because they soak up paint, while the rest looks shinier. Sand the patch smooth, spot prime it, and repaint the whole wall. A coat of paint on the patch alone usually still shows.
Example 3: Raised roller marks. Parallel ridges show in angled light because the roller was overloaded or reworked paint that had started to dry. Extra paint follows the ridge shape underneath. Let the paint dry, sand the ridges smooth, wipe off the dust, and recoat the wall.
Example 4: Spray paint runs. A drip formed on a spray-painted piece. Let the paint dry as directed on the label, level the run with fine sandpaper, clean off the dust, and apply light coats. Spraying more paint over a wet run just makes a bigger one.
Uneven Paint Troubleshooting Table
Most symptoms can have more than one cause, so use this as a starting point, not a final verdict.
| Paint Problem | Likely Causes | Recommended Fix |
|---|---|---|
| Patchy color | Insufficient coverage, inconsistent application, unmixed paint | Wait for the label’s recoat time, then apply an even coat if the surface is otherwise sound |
| Raised roller marks or lap marks | Overloaded or dry roller, reworking semi-dry paint | Let dry, sand smooth, wipe off dust, recoat the wall |
| Shiny and dull patches (flashing) | Porous or patched surface, uneven film thickness, over-thinned paint | Prime absorbent spots, then repaint the whole wall corner to corner |
| Frame of different color or sheen around edges | Brushed and rolled paint with different film build | Roll the full wall promptly; test lightly rolling over the cut-in band |
| Drips and runs on walls | Too much paint on the tool | Scrape, sand, feather the edges, recoat |
| Spray runs or orange peel | Excess paint, wrong distance, thick coats | Let dry per label, level with fine sandpaper, recoat in light coats |
| Persistent patchiness after several coats | Surface, product, conditions, or application | Diagnose the cause before adding more coats |
Safety: Sanding and Spraying
Lead paint. Homes built before 1978 may contain lead-based paint. The EPA says sanding, cutting, and demolition can create hazardous lead dust, and that about three-quarters of US homes built before 1978 still contain some lead-based paint. The EPA’s Renovation, Repair and Painting rule applies to contractors working for pay, and in general doesn’t apply to homeowners working on their own homes. The EPA still recommends that homeowners hire a lead-safe certified professional for work that disturbs paint in older homes. If your home is older and you’re about to sand paint, check the EPA’s lead guidance and consider lead testing first.
Dust and fumes. Wear eye protection and a respirator rated for fine dust when sanding, and keep the room ventilated. For spraying, follow the label for respirators, ventilation, and ignition sources.
Frequently Asked Questions
How can I fix uneven painted walls? Match the repair to the defect. Thin color usually needs another even coat. Ridges need sanding first. Porous or patched areas need primer. Uneven sheen usually needs the whole wall repainted corner to corner.
How to fix blotchy paint? Check whether the blotches follow patches or bare areas. If so, prime those areas and repaint the whole wall. Benjamin Moore advises that blotchy paint caused by missing primer usually needs priming and repainting, not endless coats.
How to repair uneven paint without repainting the whole wall? Small ridges and drips can be sanded and spot repaired, but the repair often still shows in angled light, especially in glossier sheens. For sheen or color problems, repainting the full wall usually looks best.
Are 3 coats of paint too much? Not necessarily. The number depends on the product, color change, and surface. If three coats aren’t producing a uniform finish, look for a primer or surface problem.
Can I recoat paint in 1 hour? Only if the label for your product says so. Most standard interior latex paints list a longer wait.
Can I paint two coats of paint in a day? Yes, if the label’s recoat time fits and the room is warm, dry, and ventilated.
Is it okay to cut in one day and paint the next? It can work, but the dry cut-in edge may look different from the rolled paint. Cutting in and rolling each wall in the same session reduces that risk.
Is 2 days enough for paint to dry? Usually enough to recoat and judge the finish, but not enough for full cure.
How to apply the 2nd coat of paint? After the label’s recoat time, use a well-loaded roller, work in small sections, overlap passes, keep a wet edge, and finish each wall corner to corner.
Should I sand before the second coat? Only if there are ridges, drips, or rough spots. Sanding smooth walls is optional unless the label calls for it.
Wrapping It Up
Uneven paint is fixable once you know what kind you’re dealing with. Wait for the recoat time on your label, check the wall in angled light, and match the repair to the defect: another coat for thin color, sanding for ridges, primer for porous patches, and a full-wall repaint for flashing. If the finish is still patchy after a couple of well-applied coats, stop adding paint and look at the surface, the product, and the way it was applied. And before sanding any paint in a pre-1978 home, check the EPA’s lead guidance.
1 thought on “How to Fix Uneven Paint: A Complete Step-by-Step Guide for Walls, Ceilings, and Spray Jobs”