
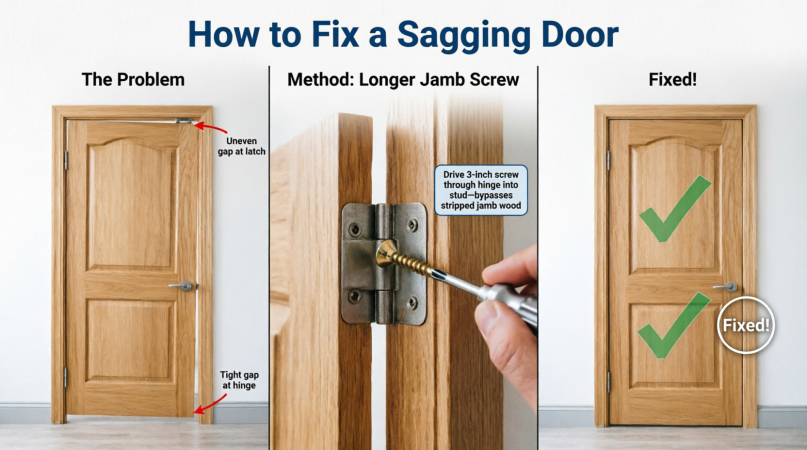
Dealing with a door that drags, rubs, or refuses to latch is a common household headache. If you are wondering how to fix a sagging door, the secret lies in identifying the root cause before making any adjustments. A sagging door is merely a symptom, not a single problem. It could be triggered by loose screws, stripped hinge holes, wood swelling, or a shifted frame. Applying the wrong fix can actually make the problem worse.
This comprehensive guide will walk you through diagnosing the issue and applying the right repair. Whether you need to know how to fix a sagging storm door, a screen door, or a heavy exterior entry door, we have you covered with professional, step-by-step guidance.
How to Fix a Sagging Door Quickly
Before diving into major repairs, try this logical, least-invasive sequence. Many doors are fixed within the first few steps:
- When figuring out how to fix a sagging door, your first step is to close the door and observe the gaps. Note exactly where the door binds or rubs against the frame
- Next, as you work on how to fix a sagging door, open the door and inspect every hinge screw on both the door and the jamb side. Tighten any loose screws until they are snug. Avoid forcing them, as this can strip the wood.
- A key detail when learning how to fix a sagging door is recognizing stripped hardware: if a screw just spins, the hole is stripped. You will need to repair the hole (see Method 3) or upgrade to a longer screw (see Method 2
- Finally, to confirm you have successfully applied the steps on how to fix a sagging door, close the door again to check the alignment.
- Close the door again to check the alignment.
Stop here if the door closes evenly and latches perfectly. Do not plane the wood, move the strike plate, or replace hardware until you have completely ruled out loose hinges.
What Are the Common Reasons for Doors Sagging?
Doors are surprisingly heavy, and they hang on just a few small screws. Over time, gravity and daily use take their toll. The most frequent culprits include:
- Loose hinge screws: Repeated opening and closing gradually works screws loose, especially at the top hinge, which bears the brunt of the pulling load.
- Stripped screw holes: The wood fibers inside the hole wear away, causing the screw to spin freely without gripping.
- Short screws: Factory-installed hinges often come with 3/4-inch to 1-inch screws. These only grip the thin door jamb, missing the solid structural framing behind it.
- Worn or damaged hinges: Bent leaves, loose knuckles, or worn pins allow the door to drop.
- Incorrect hinge mortise depth: A hinge cut too deep or too shallow changes the door’s hanging angle.
- Shifted or out-of-square frames: House settling or moisture damage can warp the jamb, meaning tightening hinges won’t solve the issue.
- Heavy doors on light hardware: Solid-core or glass doors require heavy-duty hinges and longer screws.
- Moisture swelling: Wood absorbs humidity and expands, causing doors to bind in the summer and fit perfectly in the winter.
- Flooring changes: New carpet, tile, or a thicker threshold can cause a door to drag at the bottom, even if the door itself hasn’t moved.
Pro Tip: A rubbing door isn’t always sagging. Mechanical misalignment worsens over time and shows uneven gaps. Swelling is usually seasonal and affects the door edges more uniformly. Always check this before cutting or planing any wood.
How to Diagnose a Sagging Door
A proper inspection takes just a few minutes and prevents you from fixing the wrong thing.
- Check the reveal: This is the gap between the door edge and the frame. On a properly hung door, this gap is fairly even (typically around 1/8 inch). If the gap is wide at the bottom latch corner and tight at the top, the hinge side has likely dropped.
- Inspect the hinges: Look for screw heads sitting proud of the hinge leaf, visible wear at the knuckles, or leaves that shift when you push the door up and down.
- Test the screws: Gently turn each screw with a screwdriver. If it tightens, it was just loose. If it keeps spinning, the hole is stripped.
- Look for frame problems: Check if the jamb moves when pushed, or if there are signs of rot, splits, or moisture stains.
Symptom Diagnosis Guide:
- Door rubs near the upper latch corner: Likely hinge sag or frame misalignment. Inspect the upper hinge and reveal.
- Door drags at the bottom: Could be sagging, flooring interference, or wood swelling. Check hinge security and floor clearance first.
- Door will not latch: Misaligned latch and strike plate, or severe door sag. Check door alignment before touching the strike plate.
- Screw spins without tightening: Stripped screw hole. Inspect the hole and surrounding wood.
- Hinge leaf visibly moves: Loose screws or damaged attachment. Check screw grip and wood condition.
- Gaps are uneven despite secure hinges: Incorrect hinge position or frame distortion. Check hinge seating and frame alignment.
Treat these as clues to guide your repair, not as final diagnoses.
How to Fix a Sagging Door Step by Step
Work through these methods in order. Each step assumes the previous one did not completely solve the problem.
Safety Note: Doors are heavy. Always support the door with a helper, a wedge, or a stack of shims under the latch edge before removing any screws or hinge leaves. Wear eye protection when drilling or cutting.
Method 1: Tighten Loose Hinge Screws
This is the best way to fix a sagging door hinge in most cases.
- Open the door far enough to comfortably reach every hinge.
- Check the screws on both the door-side and jamb-side leaves of each hinge.
- Lift the door slightly by the handle edge to take the weight off the hinges while you work.
- Tighten each loose screw with a properly sized driver until snug.
- Close the door and check the reveal. Stop immediately if a screw spins freely, the wood cracks, or the hinge shifts. Overtightening can strip the hole, damage the screw head, or distort the hinge.
Method 2: Use a Longer Jamb-Side Screw
A short screw may only hold the thin jamb. A longer screw passes through the jamb and bites into the solid framing behind it, providing a much stronger anchor.
- Start with the top hinge, as it carries the most pulling load.
- Remove just one screw from the jamb-side leaf. Never remove all screws at once.
- Replace it with a longer wood screw (typically 2.5 to 3 inches) that fits the hinge hole and sits flush in the countersink.
- Drive it in gradually, checking the door’s alignment as you tighten. The screw will often pull the hinge, and the door with it, back into perfect line.
- Close the door and recheck the reveal. Cautions: The screw only helps if it reaches sound framing. Be aware of concealed electrical cables or plumbing inside the wall. Do not replace every hinge screw with a long one, as this can pull the jamb out of position. Also, avoid long screws on the door side of a hollow-core door, as there is no solid material to anchor them.
Method 3: Repair Stripped Hinge Screw Holes
If a screw spins freely, the wood fibers are gone. Here is the best way to fix a door hinge when the hole is stripped.
Toothpick and Wood Glue Repair (for minor stripping in solid wood):
- Remove the loose screw and support the door if necessary.
- Inspect the hole for splits or rot.
- Coat wooden toothpicks or small wood slivers with wood glue and pack them tightly into the hole until it is firmly filled.
- Let the glue cure completely according to the manufacturer’s instructions.
- Trim the toothpicks flush with a sharp utility knife or chisel.
- Drill a small pilot hole if needed, then reinstall the screw.
Why put toothpicks in door hinges? The toothpicks and glue replace the missing wood fibers, giving the screw threads a solid material to bite into again.
When to use something stronger: If the hole is badly damaged, drill it out and glue in a hardwood dowel, then drill a fresh pilot hole. Toothpicks are not suitable for severely damaged wood, hollow sections, or split jambs.
Method 4: Adjust Hinge Alignment with Shims
A shim behind a hinge leaf changes how far that leaf sits from the door or jamb, subtly tilting the door. A thin piece of cardboard cut to the size of the hinge leaf is a common, effective choice.
- Support the door and loosen the screws on the hinge you want to adjust.
- Place a thin shim behind the jamb-side leaf, then retighten the screws.
- Close the door and check the reveal. Where the shim goes depends on the geometry. For a door rubbing at the top latch corner (with hinges on the left), placing a shim behind the bottom hinge shifts the bottom of the door toward the latch side, opening up space at the top. Add one thin shim, test, and adjust. Too much shimming creates new gaps and can disrupt latching.
Method 5: Replace Worn or Damaged Hinges
New hinges are only justified if you see bent leaves, loose knuckles, corroded pins, or hardware that is too light for the door’s weight. Match the hinge size, corner style (square or rounded), screw-hole positions, and load rating. Will new hinges fix a sagging door? Only sometimes. They help when the hinge itself is the problem, but they will not fix stripped screw holes or an out-of-square frame.
How to Fix a Sagging Door That Won’t Latch
A door that refuses to latch has likely dropped, or the strike plate is misaligned. Always fix the door’s alignment first.
- Check whether the door sits evenly in the frame.
- Inspect the hinges and the reveals.
- Correct any sag using the methods above.
- Test the latch again. Only if the door is perfectly aligned and the latch still misses should you adjust or file the strike plate. Moving the strike plate to chase a sagging door treats the symptom and leaves the root problem intact.
How to Fix a Door That Jiggles When Closed
A door that rattles in the frame is often suffering from a loose hinge or a strike plate that allows the latch to move. Tighten the hinges first. If the door is aligned but still feels loose when closed, the strike plate position or the latch hardware is the likely culprit. Adjusting the strike plate tab or adding a rubber bumper can eliminate the jiggle.
How to Fix a Sagging Door at the Bottom
A door that drags on the floor is not always sagging. Check these factors in order:
- Hinge security: Tighten loose screws and repair stripped holes.
- Floor clearance: New flooring or a thicker threshold may have reduced the gap.
- Moisture: If the door sticks only in humid weather, swelling is likely. Sealing the door edges and bottom is a better long-term answer than cutting it.
- Frame alignment: Check whether the jamb has shifted. If hinge repair restores clearance, you are done. If the door still drags after the hinges are secure, careful trimming of the bottom edge may be appropriate. Do this last, because cutting is permanent. Note: Fire-rated or security-rated doors may have restrictions on altering them. Check the manufacturer’s instructions first.
How to Fix a Sagging Door Frame
Suspect the frame instead of the hinges when:
- Reveals stay uneven even after the hinge screws are secure.
- The jamb moves or looks visibly displaced.
- You see rot, splits, or moisture damage.
- The opening is visibly out of square. Frame shims differ from hinge shims. Frame shims go between the jamb and the wall framing to straighten the jamb itself, requiring careful measurement and fastening. Significant frame movement, rot, or structural issues may require a professional carpenter. Do not expect simple hinge adjustments to fix a structural problem.
How to Fix a Sagging Exterior or Front Door
Exterior doors are heavier and carry more load on the hinges. They also feature weatherstripping, a threshold, and a deadbolt that must all function perfectly after the repair.
To tighten up a front door, start with the standard steps: tighten hinge screws, replace a top-hinge jamb screw with a longer one into the framing, and repair stripped holes. Then, verify three critical things:
- The door closes and latches securely, and the deadbolt throws smoothly without binding.
- The weatherstripping seals evenly all the way around.
- The threshold clearance is correct. If the deadbolt binds or the seal fails after repair, keep adjusting the alignment. Never compromise lock engagement or weatherproofing just to make the door easier to close. Watch for rot and corrosion on exterior frames, as moisture damage can undermine screw holds. If an exterior door cannot latch securely after reasonable adjustments, call a professional.
How to Fix a Sagging Storm Door or Screen Door
These are lightweight assemblies, so do not apply heavy entry-door advice blindly. Always check the manufacturer’s instructions for your specific model before adjusting or replacing hardware.
Storm Door Repair:
Most storm doors have a metal frame screwed to wood trim around the main door. Sagging usually happens when the metal frame on the hinge side comes loose, or when the trim itself loosens.
- Open the door partway and push it up and down while watching the hinge side. If the wood trim moves, secure it with extra nails or screws near the top.
- If the metal frame is the loose part, add screws through the frame, and tighten the existing ones. You can use a thin shim between the door and frame to hold it in position while tightening.
- Inspect the closer bracket and mounting screws for looseness or damage.
- Check the hinge system for bent parts.
Note: Closer tension does not fix a loose hinge or a distorted frame. If the storm door sags despite tight screws, inspect the mounting rail and hinge system against the manufacturer’s procedure.
Screen Door Repair:
Screen doors are very light, so sag usually comes from loose hinges, loose corner fasteners, or a frame that has gone out of square. Start by tightening hinges and checking the corners. For persistent sag, a diagonal brace or turnbuckle kit can pull the frame back into square. This works best when installed precisely per the kit’s instructions, though it does change the door’s appearance.
Door Types at a Glance
- Interior Doors: Moderate weight; standard butt hinges. Hollow-core doors limit screw options.
- Exterior/Front Doors: Heavy; stronger hinge loads. Requires attention to deadbolt alignment, weatherstripping, threshold, and moisture.
- Storm Doors: Lighter; metal frame on trim. Check mounting rail, closer brackets, and manufacturer instructions.
- Screen Doors: Very light frame. Focus on corner fasteners, diagonal braces, and avoid heavy-door screw advice.
Practical Examples
- Example A: Door rubs at the upper latch corner. Inspect the top hinge, tighten loose screws, and if they won’t grip, add a longer jamb-side screw into the framing. If the rub persists, test a thin shim behind the bottom hinge.
- Example B: A hinge screw spins. If it tightens, it was just loose. If it spins freely, the hole is stripped. Use toothpicks and glue for minor damage in solid wood, or a dowel for larger holes.
- Example C: Door drags on the floor. Check hinge sag first, then flooring clearance, then moisture swelling, then frame alignment. Trim the door only after all of those are ruled out.
- Example D: Front door will not latch. Correct the sag first. Move the strike plate only if the door is aligned and the latch still misses.
- Example E: Storm door sags despite tight screws. Look at the mounting rail, closer brackets, and hinge system, and follow the manufacturer’s adjustment procedure.
Common Mistakes to Avoid
- Replacing every hinge screw with a long one without diagnosing the actual cause.
- Overtightening until the hinge bends or the jamb shifts.
- Moving the strike plate before fixing the underlying sag.
- Planing or cutting the door before ruling out loose hinges and seasonal swelling.
- Using long screws in a hollow-core door.
- Removing all hinge screws at once without supporting the door.
- Forcing screws into damaged wood.
When to Call a Door Repair Professional
Following pro-level methods similar to those recommended by This Old House, knowing when to call for help saves time and money. Call a qualified carpenter or door installer when you find:
- Cracked, split, or rotten structural wood.
- Significant frame movement or building settlement.
- A door too heavy to support safely on your own.
- Hinges that fail repeatedly after proper repair.
- Damaged security hardware, or an exterior door that cannot latch securely.
- Several doors in the house becoming misaligned simultaneously, which can signal broader building movement. A simple loose screw does not need a professional, but structural issues do.
Frequently Asked Questions
Will new hinges fix a sagging door?
Only if the hinges themselves are bent, worn, or too light for the door. New hinges will not fix stripped screw holes or an out-of-square frame, so repair those foundational issues first.
Can I fix a loose door hinge using a toothpick?
Yes, for minor stripping in solid wood. Pack glued toothpicks into the hole, let it cure, trim it flush, and reinstall the screw. They are not suitable for severe damage, hollow sections, or split jambs.
How do you tighten a wobbly hinge?
Check every screw on both leaves and tighten loose ones. If a screw spins, repair the hole or use a longer jamb-side screw. If the hinge knuckles themselves are loose, the hinge is worn and should be replaced.
Can a sagging door be fixed without removing it?
Often, yes. Tightening screws, adding a longer screw, and many hole repairs can be done with the door in place. Just support the door when removing screws. Shimming or replacing a hinge may require partly lifting or removing the door.
How do you fix uneven door gaps?
Find out whether the cause is loose hinges, a stripped hole, a hinge needing a thin shim, or a shifted frame. Fix the hinge side first. If gaps stay uneven with secure hinges, inspect the frame for squareness.
Can you fix a hinge without tools?
A minor loose hinge usually needs at least a screwdriver. Pressing screws in by hand will not make a durable repair, and using a coin is a poor substitute for a proper driver. A temporary fix may buy time, but always complete the real repair with proper tools.
Final Takeaway
Diagnose before you repair. A loose screw, a stripped hole, a worn hinge, and a shifted frame can all look like a sagging door, and each requires a different fix. Start with the least invasive repair: tighten and anchor the hinges. Move on to shims or frame adjustments only if the door still rubs, drags, or fails to latch. Once it closes evenly and latches securely, your job is done.